この記事では、「Python Kivyプログラミング Pythonで作るマルチタッチアプリ」という本を頼りに、章の終わりごとに対応する公式サイト(英語で泣きそう)のサンプルプログラムに挑戦しています。
また、動画の場合、何分何秒のコードとYouTubeを途中で止めて、コードと実行結果を掲載しています。
上の本の、5章を終えた所までで類題として作れるアプリです。
Video(YouTube)
<<関連記事>>
Kivyというライブラリを使ってPythonでアプリを作って行く
Python自作サンプル集
Swiftでアプリ開発される方向け
これからプログラミングを始める方へ
プログラミングと資格について
この動画では、前回PythonとKV言語で作ったプログラムを改変していきます。
Kivy公式サイトのKivy Crash Course 7 – Drawing on the canvasで作った所までです。
前回のコード
「main.py」
from kivy.app import App
from kivy.uix.scatter import Scatter
from kivy.uix.label import Label
from kivy.uix.floatlayout import FloatLayout
from kivy.uix.textinput import TextInput
from kivy.uix.boxlayout import BoxLayout
from kivy.properties import ListProperty,ObjectProperty
from kivy.graphics.vertex_instructions import (Rectangle,
Ellipse,
Line)
from kivy.graphics.context_instructions import Color
import random
class ScatterTextWidget(BoxLayout):
text_colour=ListProperty([1,0,0,1])
def init(self,kwargs):
super(ScatterTextWidget,self).init(kwargs)
def change_label_colour(self,args):
colour=[random.random()
for i in range(3)]+[1]
self.text_colour=colour
class TutorialApp(App):
def build(self):
return ScatterTextWidget()
def some_function(args):
print(‘text changed’)
if name == “main”:
TutorialApp().run()
「tutorial.kv」
<ScatterTextWidget>:
orientation:’vertical’
canvas:
Color:
rgba:0,0,1,1
Rectangle:
pos:self.pos
size:self.size
TextInput:
id:my_textinput
font_size:150
size_hint_y:None
height:200
on_height:do_someting()
text:’default’
on_text:root.change_label_colour()
FloatLayout:
Scatter:
Label:
id:my_label
text:my_textinput.text
font_size:150
color:root.text_colour
BoxLayout:
orientation:’horizontal’
size_hint_y:None
height:150
Label:
id:label1
text:my_textinput.text[:3][::-1]
font_size:100
color:root.text_colour
Label:
id:label2
text:my_textinput.text[-3:][::-1]
font_size:100
color:root.text_colour
これを今回用に改変していきます。
エディタ Visual Studio Codeに書いていってターミナルで実行します。
前回の「crash7」というフォルダの内容「main.py」と「tutorial.kv」を、今回の「crash8」というフォルダに保存して動作を確認しました。
では、今回の動画(全部英語で泣きそう)をみながら食らいついてコードを書きました。
ここから図形描画のコードを追記していきます。
半透明の緑の長方形を文字の上に被せます。
2分04秒
「main.py」
同上
「tutorial.kv」
<ScatterTextWidget>:
orientation:’vertical’
TextInput:
id:my_textinput
font_size:150
size_hint_y:None
height:200
on_height:do_someting()
text:’default’
on_text:root.change_label_colour()
FloatLayout:
Scatter:
Label:
id:my_label
text:my_textinput.text
font_size:150
color:root.text_colour
canvas:
Color:
rgba:0,1,0,0.5
Rectangle:
pos:self.pos
size:self.size
BoxLayout:
orientation:’horizontal’
size_hint_y:None
height:150
Label:
id:label1
text:my_textinput.text[:3][::-1]
font_size:100
color:root.text_colour
Label:
id:label2
text:my_textinput.text[-3:][::-1]
font_size:100
color:root.text_colour
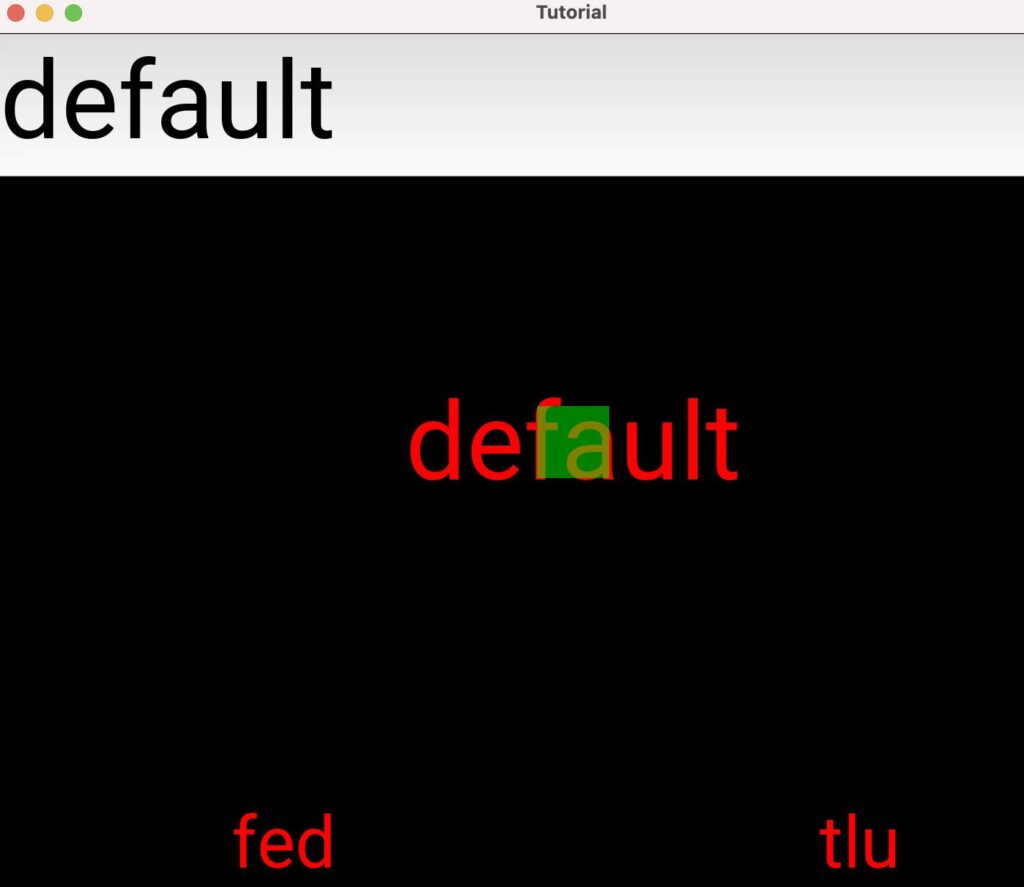
動画の3分19秒あたりまでの内容です。
「main.py」
同上
「tutorial.kv」
<ScatterTextWidget>:
orientation:’vertical’
TextInput:
id:my_textinput
font_size:150
size_hint_y:None
height:200
on_height:do_someting()
text:’default’
on_text:root.change_label_colour()
FloatLayout:
Scatter:
Label:
id:my_label
text:my_textinput.text
font_size:150
color:root.text_colour
size:self.texture_size
canvas:
Color:
rgba:0,1,0,0.5
Rectangle:
pos:self.pos
size:self.size
BoxLayout:
orientation:’horizontal’
size_hint_y:None
height:150
Label:
id:label1
text:my_textinput.text[:3][::-1]
font_size:100
color:root.text_colour
Label:
id:label2
text:my_textinput.text[-3:][::-1]
font_size:100
color:root.text_colour
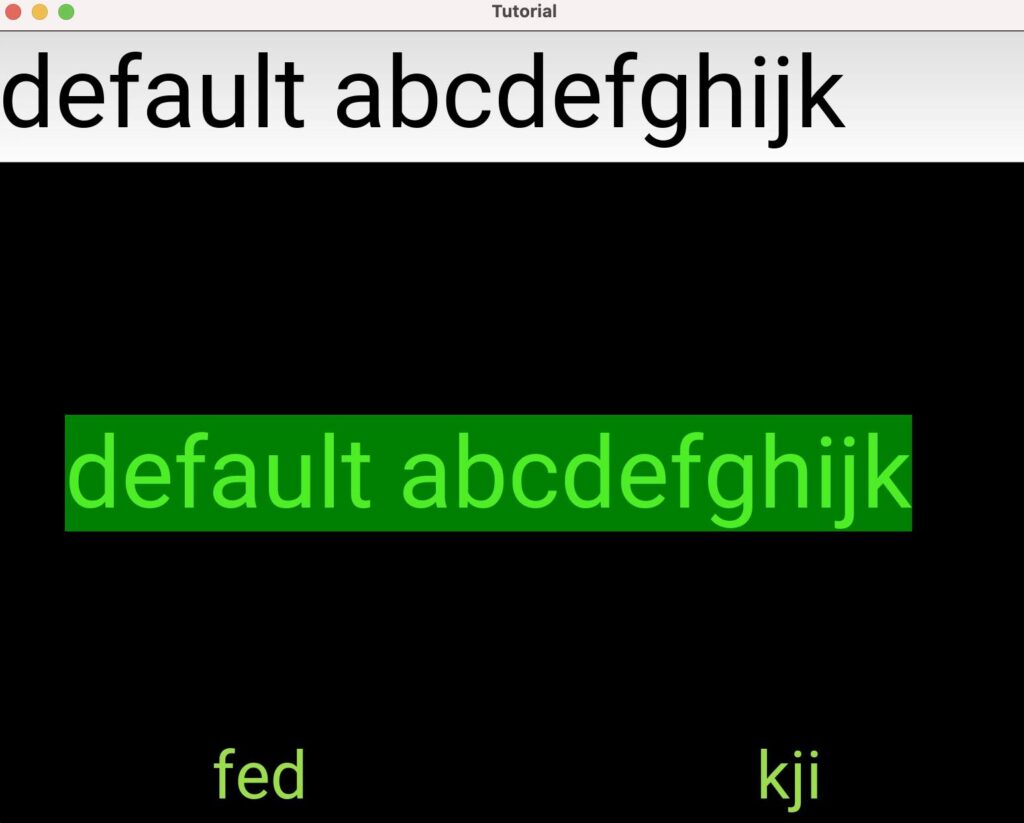
長方形のラベルが、文字の長さに自動的に調整しています。
5分9秒ぐらいでは、赤い大きい長方形のラベルを追加して、動かせます。
「main.py」
同上
「tutorial.kv」
<ScatterTextWidget>:
orientation:’vertical’
TextInput:
id:my_textinput
font_size:150
size_hint_y:None
height:200
on_height:do_someting()
text:’default’
on_text:root.change_label_colour()
FloatLayout:
Scatter:
canvas.after:
Color:
rgba:1,0,0,0.5
Rectangle:
size:self.size
pos:self.pos
Label:
id:my_label
text:my_textinput.text
font_size:150
color:root.text_colour
size:self.texture_size
canvas:
Color:
rgba:0,1,0,0.5
Rectangle:
pos:self.pos
size:self.size
BoxLayout:
orientation:’horizontal’
size_hint_y:None
height:150
Label:
id:label1
text:my_textinput.text[:3][::-1]
font_size:100
color:root.text_colour
Label:
id:label2
text:my_textinput.text[-3:][::-1]
font_size:100
color:root.text_colour
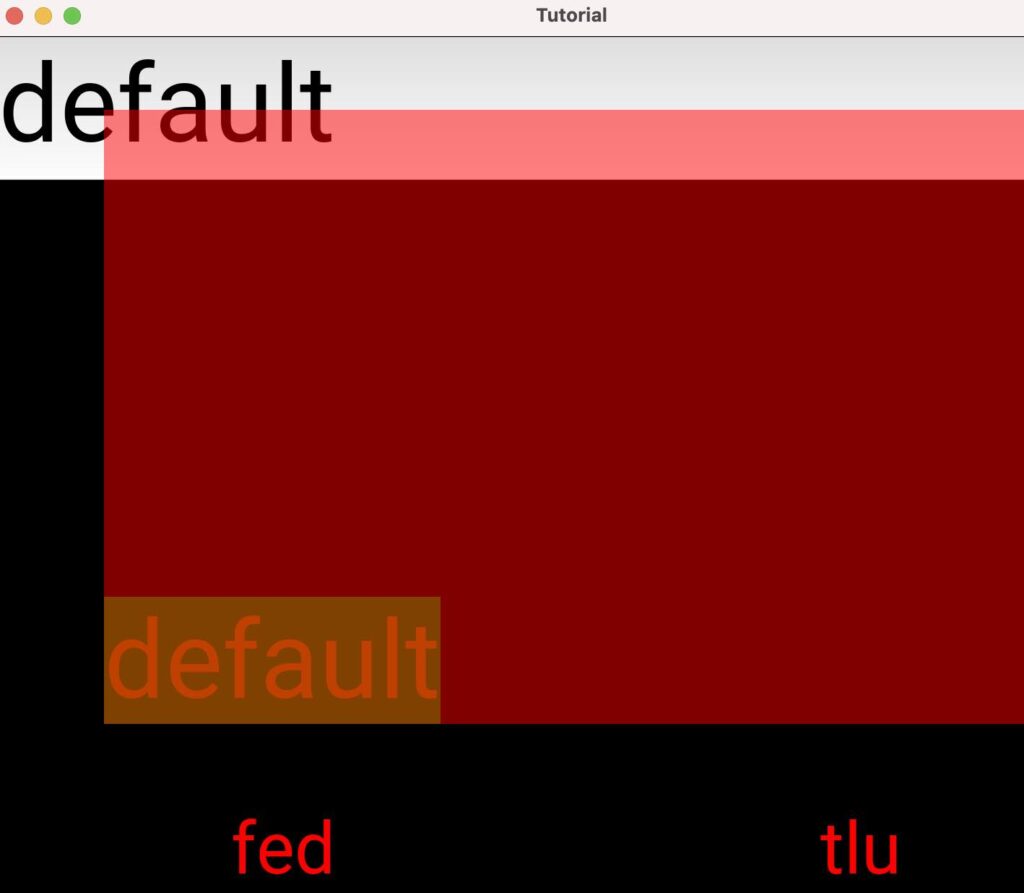
6分33秒ぐらいでは、赤と緑の二重ラベルになります。
「main.py」
同上
「tutorial.kv」
<ScatterTextWidget>:
orientation:’vertical’
TextInput:
id:my_textinput
font_size:150
size_hint_y:None
height:200
on_height:do_someting()
text:’default’
on_text:root.change_label_colour()
FloatLayout:
Scatter:
size_hint:None,None
size:my_label.size
canvas.after:
Color:
rgba:1,0,0,0.5
Rectangle:
size:self.size
pos:self.pos
Label:
id:my_label
text:my_textinput.text
font_size:150
color:root.text_colour
size:self.texture_size
canvas:
Color:
rgba:0,1,0,0.5
Rectangle:
pos:self.pos
size:self.size
BoxLayout:
orientation:’horizontal’
size_hint_y:None
height:150
Label:
id:label1
text:my_textinput.text[:3][::-1]
font_size:100
color:root.text_colour
Label:
id:label2
text:my_textinput.text[-3:][::-1]
font_size:100
color:root.text_colour
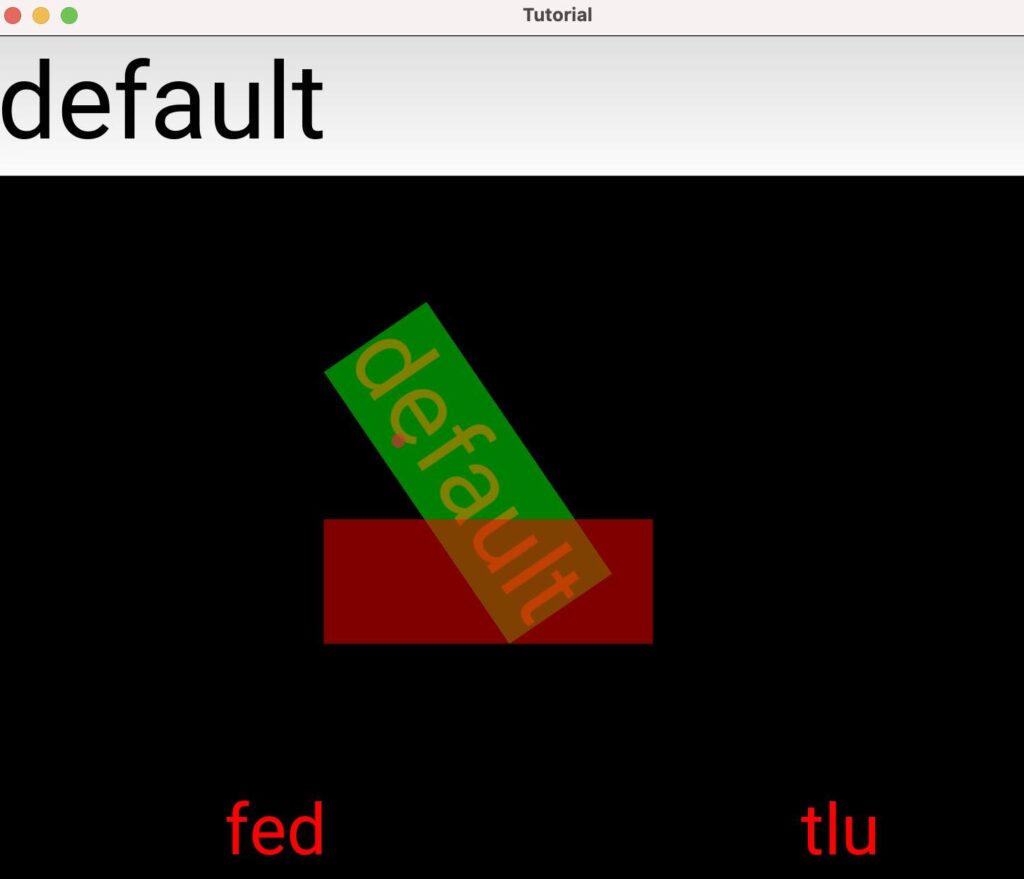
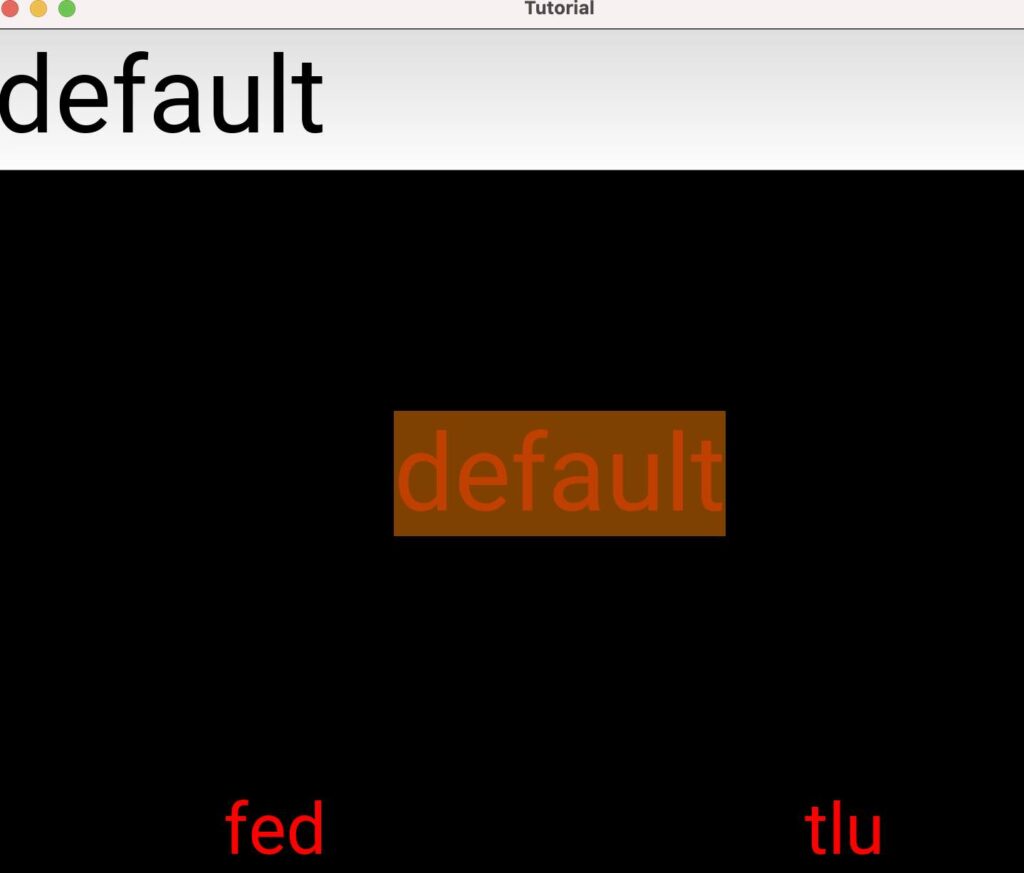
8分18秒ぐらいでは、中央に配置されます。
「main.py」
同上
「tutorial.kv」
<ScatterTextWidget>:
orientation:’vertical’
TextInput:
id:my_textinput
font_size:150
size_hint_y:None
height:200
on_height:do_someting()
text:’default’
on_text:root.change_label_colour()
FloatLayout:
Scatter:
center:self.parent.center
size_hint:None,None
size:my_label.size
canvas.after:
Color:
rgba:1,0,0,0.5
Rectangle:
size:self.size
pos:self.pos
Label:
id:my_label
text:my_textinput.text
font_size:150
color:root.text_colour
size:self.texture_size
canvas:
Color:
rgba:0,1,0,0.5
Rectangle:
pos:self.pos
size:self.size
BoxLayout:
orientation:’horizontal’
size_hint_y:None
height:150
Label:
id:label1
text:my_textinput.text[:3][::-1]
font_size:100
color:root.text_colour
Label:
id:label2
text:my_textinput.text[-3:][::-1]
font_size:100
color:root.text_colour
Kivyというライブラリを使ってPythonでアプリを作って行く
Python自作サンプル集
Swiftでアプリ開発される方向け
これからプログラミングを始める方へ
プログラミングと資格について
